


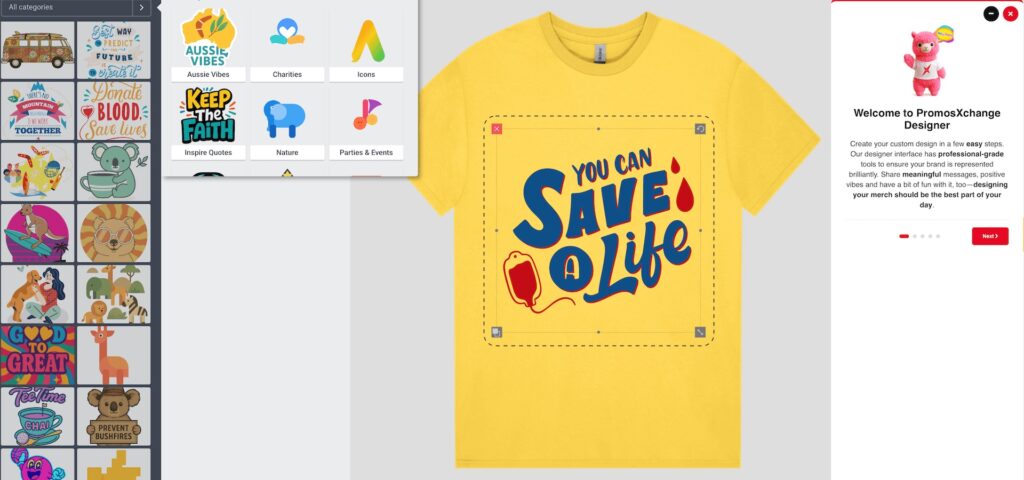
Welcome to the PromosXchange Online Product Designer. Our designer interface has professional-grade tools to make sure your brand is represented brilliantly across all your merchandise. We hope to inspire you to use it for meaningful messages in branding and to share positive vibes. We want you to have a bit of fun with it, too—designing your merch should be the best part of your day, so we’ve made the process as smooth and creative as possible.
1. Navigating the Design Interface
The PromosXchange designer tool is engineered for high-level customisation with a streamlined workflow to ensure your branded products look as intended. Whether you’re a seasoned pro or just exploring new ideas, the interface is designed to be intuitive and easy to navigate, so you can focus on creating something standout seamlessly.
- The Canvas: Think of this as your primary workspace. One thing to keep an eye on is the Safe Zone (that’s the inner dotted line on the screen which appears when an object is on the canvas). You’ll want to ensure all your text and logos stay inside this boundary—it’s the best way to make sure nothing gets caught by seams or product edges during the print process.
- Layer Management: Found in the top right bar, this tool lets you handle any overlapping elements with ease. If you want to change the stacking order, just drag the layers vertically to move them from Front to Back. It’s a simple way to get your design elements sitting exactly where they should.
- Multi-View Control: Since most of our merchandise features multiple branding areas, you’re not just limited with one side. Use the toggle thumbnails to switch between the Front, Back, and Side/Other views. It’s actually quite fun to explore different placements, and it ensures you’ve got a cohesive design across the entire product.
Create your custom design in a few easy steps:
👕 Step 1. Product Options
On the Product Panel, choose your options i.e. Colour, Size, Quantity. Check the Minimum Quantity before you start designing.
🎨 Step 2. Add Your Branding
Head over to the Design Panel to start customising your product. This is your main spot for managing logos, text and graphics. To make sure you get a sharp, premium finish, we definitely recommend using high-resolution files so your details stay crisp and clear.
- Files or Images: Just click Uploads to upload your logo, images or any custom files straight from your device.
- Clip-Art: Have a browse through our complimentary clip-art library. We’ve got a range of categories ready to go, including Aussie Vibes, Charities, Icons, Inspire Quotes, Nature, Parties & Events, Schools & Unis, Seasons & Holidays, Tech & Gaming and Shapes.
- Text & Effects: We’ve got plenty of trendy fonts to choose from, including curved options. Click any text on your canvas to adjust the font size, letter spacing or line height. If you want to take it up a notch, use the advanced tools to adjust the radius and curve, or toggle on the Trident effect—this adds a bold, triple-layered outline to your text to give it some serious 3D depth.
Once you’ve perfected the look, just hit Update Text to lock in your changes.
🖱️ Step 3. Customise Objects
Click on any item on your canvas to open up the top toolbar. This is your go-to spot to Resize, Rotate, or Change Colours. You can easily stack and layer multiple items to get your design looking just right. When you select an object, you’ve got plenty of cool features to play with:
- Make it Your Own: Give your images a fresh look by adding filters, using the remove background tool for a clean finish, or using fill with colours to change things up. For a completely transparent look, just click the object’s background colour and slide the second opacity bar all the way down to rgba(255, 255, 255, 0). You can also mask or crop your images to get the perfect framing.
- Organise Your Design: Use arrange layers to move items forward or backward (kind of like stacking papers). If you’ve got an element exactly where you want it, use lock object position so it stays put while you work on the rest. You can also use position for pinpoint accuracy.
- Switch & Shape: Need to swap a graphic? Use replace object to keep your placement but change the image. If you’re feeling creative, use transform to rotate, flip, or skew your objects—which lets you tilt and stretch them for a unique 3D look.
Once you’re happy with the placement, you’re all set.
✅ Step 4. Finalise and Save
Once you’ve nailed the design, click Save to MyDesigns in the top bar to keep it ready for later. If you want to use that same look on other product variations, just jump into the Product Panel, pick your options and hit Add to Cart.
Take a quick look over the items in your design cart to make sure every detail is spot on. When everything is looking right, click the Next button at the top right to head through to your final shopping cart.
That’s it.
Quick Tip: Need to edit your design when you’re in your final shopping cart? Not a problem. Simply click Edit design on the product variation to go back to the designer.
2. Technical Guidelines for Print Methods
Selecting the correct design approach for your specific decoration method is vital for a high-quality, professional result.
🌈 Digital / UV Printing (Best for Complex Graphics)
- Applications: Full-colour tech items, notebooks, and photographic prints.
- The Method: High-resolution industrial inkjet technology.
- Technical Advice: Best for gradients and multi-colour logos. Ensure your images are 300 DPI and use Transparent PNGs to avoid an unintended background block.
🖼️ Screen Printing (Best for Apparel & Textiles)
- Applications: Custom T-shirts, tote bags, and hoodies.
- The Method: Ink is applied through a fine mesh screen.
- Technical Advice: Use Vector files (SVG/AI) for the crispest output. Limit your palette to solid spot colours (Pantone) for the most value and durable bulk production.
🪡 Embroidery (Best for Premium Apparel)
- Applications: Branded caps, beanies, and corporate polos.
- The Method: Logos are digitised into a stitch map and sewn directly into the fabric.
- Solid Colours: Use solid, distinct colours only. Embroidery machines use individual threads, so they cannot reproduce gradients, fades, or shading.
- Design Constraints: * Text Size: Keep text at a minimum of 5mm tall to ensure it remains legible.
- Line Weight: Avoid lines thinner than 1mm, as they may disappear into the fabric.
- Simplicity: Simplify complex logos by removing fine details or thin outlines that can cause “puckering” or thread breaks.
- Fabric Choice: Be mindful of the material. Heavy fabrics like beanies or fleece require bolder designs, as fine details can get lost in the textured surface.
🖊️ Pad Printing (Best for Small & Curved Goods)
- Applications: Promotional pens, golf balls, and hardware.
- The Method: Ink is transferred via a silicone pad.
- Technical Advice: Avoid ultra-fine lines or intricate serifs. Use solid, high-contrast colours and keep designs minimalist to ensure the ink remains sharp on small surfaces.
Pro Tip: If a logo looks cluttered at a small size on screen, it will likely need simplifying to ensure a clean, professional finish in thread.
3. 🚀 Optimise Your Design Experience
For the smoothest performance and most accurate rendering, we recommend keeping your device updated with the latest software and using Google Chrome or Mozilla Firefox.
Why? Our designer uses high-performance engines optimised for modern browsers. While Safari is supported, Chrome and Firefox provide the fastest and best experience for complex layouts and advanced tech tools.
🛠️ Quick Fixes for Display or Performance Issues
If you encounter any unexpected glitches, slow loading times, or rendering issues on your device, try the following steps to refresh your device:
- Reload the Page: A quick refresh solves most minor hiccups.
- Windows/Linux: Press
Ctrl+RorF5 - Mac: Press
Cmd+R
- Windows/Linux: Press
- Clear Your Browser Cache: If a normal refresh doesn’t work, outdated cached files might be causing a conflict.
- Hard Refresh (Windows): Press
Ctrl+Shift+RorCtrl+F5 - Hard Refresh (Mac): Press
Cmd+Shift+R - Via Browser Settings: You can also clear your cache by pressing
Ctrl+Shift+Delete(Windows) orCmd+Shift+Delete(Mac) and selecting “Cached images and files.”
- Hard Refresh (Windows): Press
⌨️ Industry-Standard Shortcuts
Speed up your production time using these shortcuts. These are optimised for Windows PC; Mac users should substitute the Ctrl key with Command (⌘).
| Action | Icon | PC Shortcut | Function |
|---|---|---|---|
| Undo | ↩️ | Ctrl + Z | Revert the last change instantly. |
| Redo | ↪️ | Ctrl + Y | Reapply a reverted action. |
| Duplicate | 👯 | Ctrl + D | Create an exact copy of an element. |
| Select All | ♾️ | Ctrl + A | Select every element on the current view. |
| Nudge | 🖱️ | Arrow Keys | Move selected item by 1px for precision. |
| Power Nudge | 🚀 | Shift + Arrows | Move selected item by 10px for fast placement. |
| Delete | 🗑️ | Del | Remove the selected layer or object. |
| Save | 💾 | Ctrl + S | Secure your design progress. |
📱 Designing on Mobile?
Our designer is fully responsive. For the best mobile experience:
- Easy Vertical Mode: No need to flip your phone sideways to start designing.
- Easy Zoom: Pinch and stretch to quickly zoom in on small details for precision placement.
- Long Press: Use a long press on elements to bring up the layer settings menu.
4. Final Pre-Production Checklist
Before finalising your order, perform a “Pre-Flight” check to ensure accuracy:
- Resolution Integrity: If the system displays a ⚠️ low-resolution warning, please replace your file with a high-definition version to avoid pixelation.
- Colour Accuracy: Enter your specific PMS (Pantone) or HEX codes in the colour picker. This ensures your brand identity remains consistent across different materials.
- Proofing: Double-check all spelling and contact details.
- The Virtual Mock-up: Upon submission, we will provide a formal Digital Proof. This is your final opportunity to review the scale and placement before physical production begins.
Need assistance? Just reach out to us at 1800 776 667 or email us to help you refine your artwork for professional results.
❓ Frequently Asked Questions (FAQ)
How do I use the PromosXchange online product designer for custom merch?
To start, select a product from our catalogue and click “Design.” You can then upload your logo (SVG or high-res PNG), add custom text, and position your artwork within the Safe Zone. Once your design is complete, click “Add to Cart” and “Get Quote,” and we will provide a final mock-up for your approval before production.
What is the best file format for the online product designer?
For the highest quality results, we recommend Vector files such as SVG, AI, or EPS. These files can be scaled to any size without losing clarity. If you are using a standard image file, ensure it is a high-resolution PNG or JPG (300 DPI).
Can I match my exact brand colours in the designer?
Yes. Our online designer allows you to input specific HEX codes or PMS (Pantone Matching System) colours directly into the tool. This ensures that your brand identity remains consistent across different print methods, whether you are ordering embroidered caps or pad-printed pens. It’s the best way to make sure your gear stays true to your brand every time.
What does the “Low Resolution” warning mean?
This warning pops up if your uploaded image doesn’t have enough pixels for a sharp print. To fix this, simply upload a higher-quality (300DPI) version of your logo. It’s an important one to watch out for, as printing a low-resolution file can result in a blurry or pixelated finish on your physical product—and we want your custom products looking amazing.
Is there a shortcut for undoing mistakes in the designer?
Yes. If you’re on a PC, you can use Ctrl + Z to undo an action, or Command + Z if you’re using a Mac. Our designer supports all the standard professional hotkeys to make your creative process faster and more efficient, so you can design with total confidence.
How do I design for different sides of a product?
Most of our merch—like t-shirts, mugs and bags—comes with multiple spots for your branding. Just look for the Switch View thumbnails at the bottom or side of the canvas. You can click these to toggle between the Front, Back and Side views of the product and keep your design consistent across every angle.
Will someone check my design before it is printed?
Absolutely. We review every single design submitted through our online tool. If something isn’t quite right for an optimal print—no worries! We offer complimentary design and editing to ensure your branding looks perfect on custom merch. We’ll send a final Virtual Proof straight to your inbox for a formal sign-off, so you can be 100% sure everything is spot on before we kick off the physical production process.